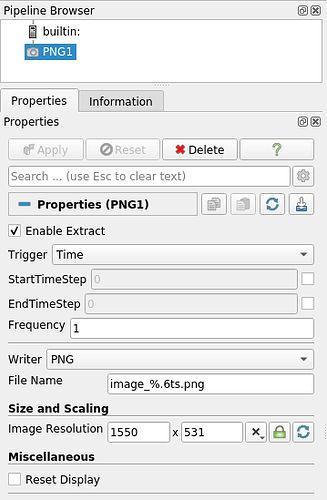
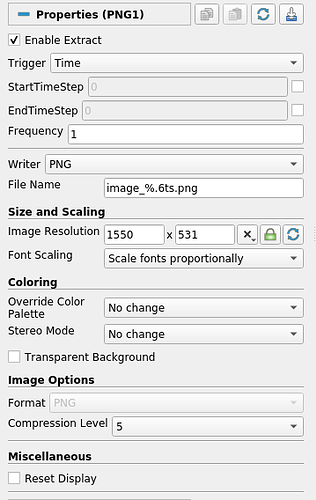
A release or so ago (I believe it was with 5.7) we introduced a concept of exports that is available through the Exports Inspector. If you’re not too familiar with it, you’re not to blame. The documentation and user guide have been a bit lagging on this. That, for once, has been a boon in disguise. That gives us an opportunity to revamp the UX and make it easier to use before it’s broadly adopted.
We have been discussing a way to improve the Exports Inspector on this issue. I started working on it a week or so ago and that snow balled into several other cleanups to Catalyst and especially Python scripts for Catalyst. Before I went too far along with these changes, I wanted to make everyone aware of these changes and solicit suggestions / objections etc.
The code is under development here.
Before we discuss the details, from now on we will call exports as extracts. We already have a concept of “export” in ParaView e.g Export Scene where we export visualization as PDF, X3D, GLTF etc. To avoid confusion with that, let’s just use a different term: extracts.
Extracts and Extract Generators
A bit of background on extracts for those who are not familiar with the concept of exports introduced in ParaView 5.7.
Extracts are data-products or outputs generated as a result of the data analysis or visualization process. Thus, in ParaView, when you save out a screenshot, you are creating an extract in form of a .png or .jpg with the rendering results. When you save out data as a .vtk file, for example, you are generating a data-extract. Traditionally, the only way for generating such extracts in ParaView was through explicit actions such as menu actions or toolbar buttons in the GUI or specific function calls in Python. Since they are actions, once you do them, they are done! Meaning that they don’t get saved in state files or restored across sessions when a state is loaded. They are not part of the visualization state. Now consider this use-case: for a visualization pipeline, you want to save out a .vtk for several of the data producers in the pipeline. Currently, you have to do that one after another manually by triggering the save-data action one at a time for each for the producers. Now, If you want to repeat this for another time-step, you have repeat those actions again! The only alternative is write a custom Python script or macro to capture the repeated actions, but is not trivial for most users.
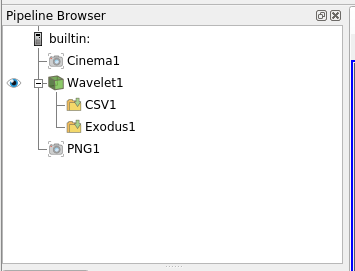
Extract Generators help us alleviate this problem. Extract generators are first class entities in ParaView, similar to sources, representations or views. An extract generator can be thought of as a sink, its input is either a data-source or a view. On activation, it generates the data-product / extract it is intended to produce. Extracts Inspector panel lets you view/create/remove extract generators (see issue for UI mockups) for the active source and / or active view. Thus, Extracts Inspector acts as the Properties Panel for extract generators.
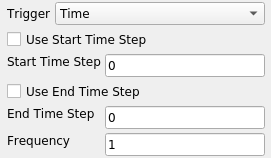
Each extract generator has two parts: trigger and writer. Trigger defines when the extract generator should be activated (or executed). Current implementation only support time related controls. You can pick the start time-step, end time-step, or frequency. In future, there may be other types of triggers. Writer is what writes the extract. For extract generators that write data, these are not much different than writers you use when you click File | Save Data. For extract generators that save rendering results, this same as the File | Save Screenshot. The Extract Inspector let’s you view/change the properties for both the trigger and the writer.
Similar to sources, filters, views, these extract generators get saved in state files, restored from state files, accessible in Python shell etc. etc. Thus, they act as standard ParaView visualization building blocks.
Generate Extracts Now
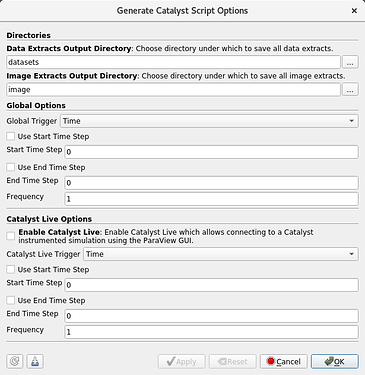
Once you have defined the extracts to generate using the extract generators, the question becomes how does one generate these extracts? One option is to use Generate Extracts Now (this will be menu option as well as button shown in the Extracts Inspector panel for easy access). When you trigger this action, you’ll be presented with dialog that lets you set some parameters for the generation process, which including things like directories under which to save the extracts.
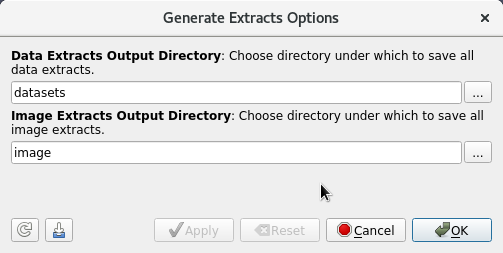
On accepting this dialog, ParaView will act as if you hit the Play button in the VCR control and start playing the animation, one frame at a time. For each frame, it will evaluate the trigger criteria for each known (and enabled) extract generator. If the trigger criteria succeeds, the extract generator is activated and causes the writer to do ‘it’s thing’ i.e, write data or save rendering result from appropriate data-producer or view for the current time-step.
When setting properties for a extracts writer in the Extracts Inspector, the file name can use patterns that allow inclusion of a time-step or time in the name. For example, a filename pattern of the form dataset_%.3ts.csv will result in filenames such as dataset_000.csv, dataset_001.csv, dataset_002.csv, etc. Here, %.3ts gets replaced by the current time-step index with at least 3 digits. Using t instead of ts results in using the current time instead. (At some point, we need to standardize this across ParaView and maybe improve the format specification too, but that’s another discussion). The generated extracts will be saved under the chosen Data Extracts Output Directory , or in case of image extract generators, Image Extracts Output Directory.
Python State File
Now, this is where things get interesting. You can always hit the “Generate Extracts Now” button and generate the extracts using the GUI. What if you want to do that in batch, so you can do it offline without holding up an interactive session? Easy! Use File | Save State and save the state out as a .py file. Similar to the .pvsm state file, the .py state contains the entire visualization state including the extract generators. In addition, the .py also includes the following few lines at the end of the script.
if __name__ ==  "__main__":
    # generate extracts
    GenerateExtracts(DataExtractsOutputDirectory="...",
        ImageExtractsOutputDirectory="...")
Now, if you execute this script using pvbatch or pvpython, passing this script as a command line argument, it will automatically generate the extracts and exit. If you import this script in some other Python script using import or open the script in ParaView GUI, the extract generation step is simply skipped.
Catalyst Python Script
This is where things get even more interesting! Now, you want to save the state out so that the extracts can be generated in situ in a Catalyst instrumented simulation. You can use the Generate Catalyst Script button in the Extracts Inspector (or appropriate menu) to generate such a script. Here, however, instead of choosing a .py to save, ParaView let’s you choose a .zip instead (more on this later). Once chosen, you’re presented with a dialog similar to the one shown on Generate Extracts Now to select extract output directors and other things such as Catalyst Live related options. A prototype dialog is as follows (note the layout will get a little prettier, this is just a under-development dialog).
The output is a new style Catalyst Python script, rather package. The package as the following structure.
[package name]/
   __init__.py      # <-- catalyst options
   __main__.py      # <-- entry point for pvbatch/pvpython
   pipeline.py      # <-- analysis script
It includes the visualization pipeline setup script named pipeline.py. This is exactly identical to the script saved when saving a standard Python state file. A __init__.py file that includes all catalyst specific options chosen in the Generate Catalyst Script Options dialog above. And a __main__.py file which has a very cool use that we’ll discuss shortly.
There are several advantages to this zip archive approach.
- all python scripts needed are bundled in a single archive, making it easier to move files around on HPC runs at scale, where we know multiple hitting disks for same file can cause issues.
- the
__init__.pyfile includes a list of the pipeline scripts. By default, it just includes thepipeline.py. But one can manually edit it to add multiple analysis scripts.
The pipeline.py file is exactly identical to the script saved when saving ParaView state as Python – note, not similar-looking or having parts that are similar-looking, but exactly identical. Thus, there’s no difference anymore when writing analysis scripts for pvpython, pvbatch or Catalyst use. When the analysis script is being executed in Catalyst, all data sources (typically readers, but don’t have to be) with a name same as the name for Catalyst input channel get seamless replaced by a producer that provides access to data on that channel instead of whatever data source was coded in the script. It naturally follows that if the same script is executed in pvbatch or pvpython, the data sources remain unchanged and hence will continue to use whatever files, if any, they were reading the data from. And this is where the __main__.py comes in handy. We can now support simply passing this .zip archive to pvbatch or pvpython instead of a typical .py script to execute. For typical Python package, the __main__.py serves as the entry point when the package is being executed as a script. When a Catalyst script / package is thus executed in pvbatch/pvpython, it results in running the same analysis pipelines and extracts-generation code except in batch mode with data sources remaining unchanged and using files instead of in situ data channels. What this does it makes it incredibly easy to test and debug the Catalyst scripts.
One thing to note, while a zip-archived package is what’s recommended, everything works just as well if you use an unzipped Python package instead i.e simply a directory containing the individual py files described. Thus, for development or debugging stages, you don’t need to worry about creating archives.
Another thing to note, simple .py files are also supported. For example, if all you want to do with your Catalyst simulation is connect to it with a ParaView GUI to view the results, the following simple script is more than adequate.
# A simple Catalyst analysis script that simple
# connects to ParaView GUI via Catalyst Live

#--------------------------------------
# catalyst options
from paraview import catalyst
options = catalyst.Options()
options.EnableCatalystLive = 1
options.CatalystLiveURL = "localhost:22222"
# set up additional params on options.CatalystLiveTrigger
# to fine tune

#--------------------------------------
# List individual modules with Catalyst analysis scripts
scripts = []
Python Bridge
To make Catalyst instrumentation easier for Python-based simulation codes, or simulation code that use Python as glue to pass data to Catalyst, we now have a new paraview.catalyst.bridge module. Once you have done the work of converting your Python data-structures to VTK, you can simply use this module to pass data and drive Catalyst. As an example, see this miniapp. This will replace the waveletDriver.py script we often use for testing purposes (which is not a complete Catalyst runtime environment and hence not a real test).
A side note: To run this new wavelet_miniapp which will be part of the paraview Python package, you will be able to do the following:
> mpirun ... bin/pvbatch -m paraview.demos.wavelet_miniapp [args for miniapp]
ParaView’s Python executables (pvbatch/pvpython) will soon support standard Python interpreter command line arguments such as -m which is used to run a library module as a script.
Logging
Python’s logging module can now be used to generate log entries. The log is integrated with the vtkLogger infrastructure and thus can be used to debug / trace.
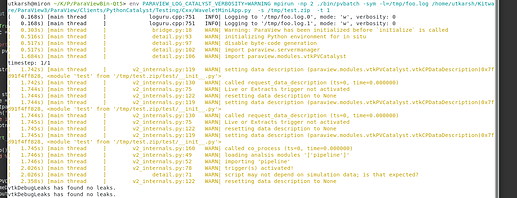
Here’s a sample log generated by the wavelet_miniapp when executing an empty analysis pipeline.
For this example, I elevated all Catalyst related information messages to WARNING and hence you’re seeing all the warnings – so don’t be alarmed!
Further, we now set the logger’s stderr verbosity to OFF on all satellite ranks during Catalyst initialization. This will ensure that at scale runs don’t get bogged down due to error/warning/info messages from satellites which are often duplicates. Of course, you can still log all messages (or chosen subset) to files.
Backwards compatibility
Old style Catalyst Python script still work. These changes don’t affect that. The old style scripts can no longer be generated, however, but that is reasonable since a script generated from a newer version of ParaView is not expected to work with an older version. ParaView 5.9 will not be able to generate a Catalyst Python script that can be used with older versions of ParaView.
Python and .pvsm state files with exports introduced in ParaView 5.7 will not be able to restore the state for the exports correctly. The rest of the visualization state will be loaded as normal. I don’t think this should affect anyone since there are several open issues which indicate that the loading of the state files with these Exports already doesn’t work as expected, if at all.
This ended up becoming a long message, apologies. Am curious to see what folks think. It’s still under development so there’s plenty of room for improvement.
